 Yiluna
AI photo background changer
Give portraits and product photos a new setting. Start from your image, describe the background, and compare the details before you use the result.
Opens Image Studio in Edit mode with a starter prompt. Upload your photo, choose a model and review the credits before generating. An account is required.
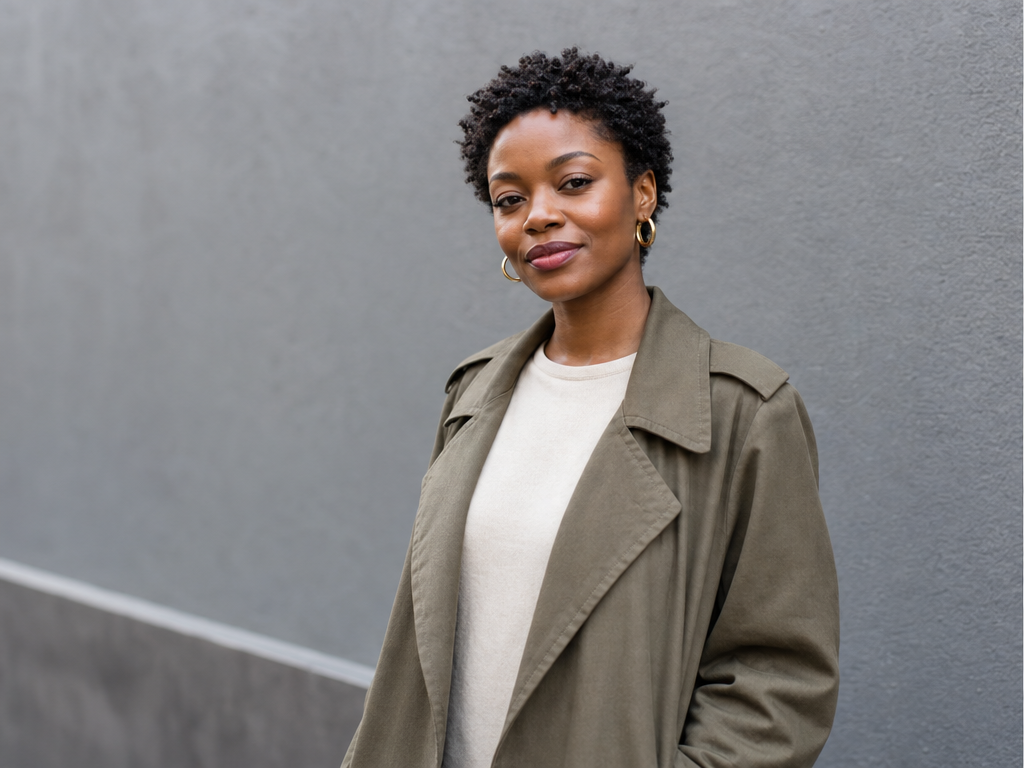
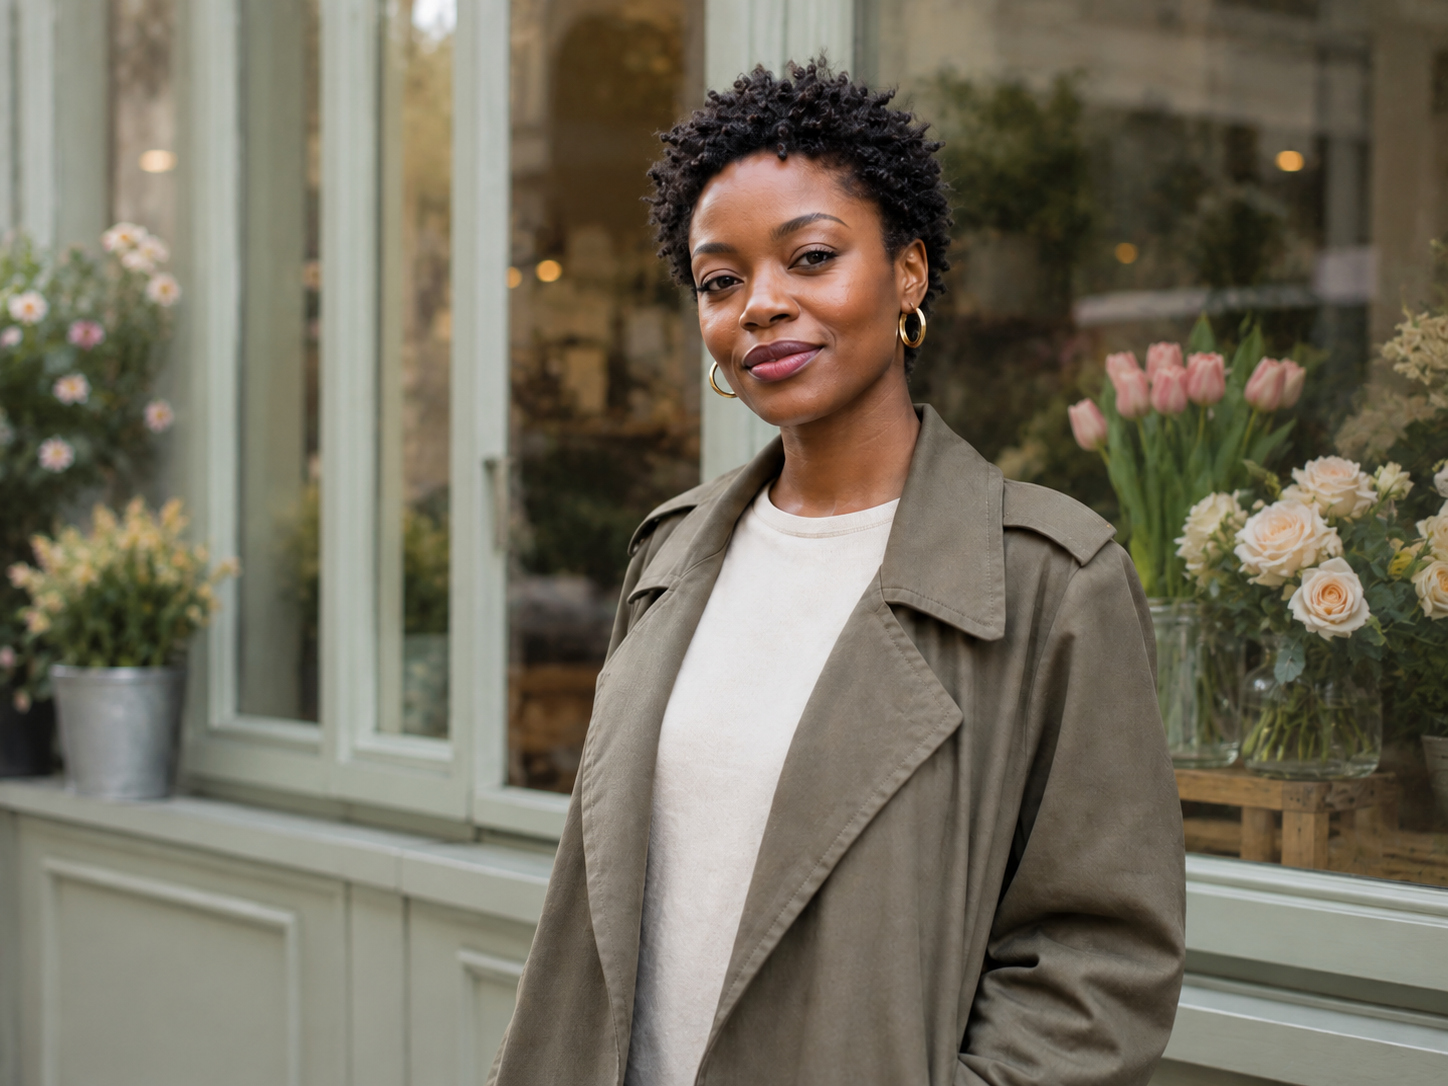
Created for this guide with OpenAI's image-generation tool on September 5, 2026, using the synthetic source portrait shown here. Open the images at full size to inspect the edit. A new result in Yiluna can vary with your selected model and settings.
Prompts for portrait and product backgrounds.
For a background-only edit, describe the replacement scene, the subject details to retain and the light that must match. The first prompt produced the editorial example above. The product prompt is a starting brief for your own photo, not a tested output.
Portrait background: gray wall to flower shop
Open the full-size source and result above. Compare the eyes, mouth, hair edge, earrings and coat lapels before accepting the new setting. Similar appearance does not mean the original pixels were preserved.
Read the prompt
Edit this exact supplied portrait. Replace only the plain gray wall and its background environment with a bright, believable neighborhood flower shop facade: pale sage-painted window frames, a softly blurred display of a few pink tulips and cream roses, and open-shade daylight matching the source. Keep the woman exactly where she is in the frame, at the same size and camera angle. Preserve her face, expression, warm brown skin tone, short natural black curls, two gold hoop earrings, olive-gray trench coat, cream round-neck top, garment seams and folds. Do not retouch or beautify her. Preserve the subject's original lighting and colors. Keep flowers behind her silhouette; do not add foreground objects or cover her body. Native exact 4:3 composition matching the input. One edited image only, full bleed. No diptych, labels, text, logos, watermark, frame, extra people or changes to the woman.

A quiet studio background for a product
Use one surface and one light direction. Review the product's lettering, edges, proportions and contact shadow against the source; a generative edit can redraw them.
Read the prompt
Replace only the background around my uploaded product with a seamless warm-white studio backdrop and a matte tabletop. Keep the same product, dimensions, material, label, color, camera angle and crop. Add a soft contact shadow consistent with the source lighting. One product, no props, no additional text. Do not redesign the packaging.
How to create your first result
Make one deliberate change per attempt. Review the result before spending credits on more versions.
- 01
Start with the original photo
Upload a sharp image with visible hair or product edges. Work from the original on each attempt. Repeatedly editing an already altered result can make identity and material changes harder to detect.
- 02
Describe the background and the light
Choose a believable scene, surface and light direction. Soft open-shade lighting is easier to match with a softly lit portrait than a scene with hard midday shadows.
- 03
Name the details that matter
For portraits, specify face, expression, hairstyle, clothing and pose. For products, name shape, packaging, lettering and color. These are editing instructions, not a guarantee that the model will preserve every pixel.
- 04
Compare at full size
Check the source and result at the same scale. Look at the silhouette, small identity details and the boundary between subject and background. If the subject changed, simplify the edit or use a cutout-and-composite workflow.
What to check when a result misses
These are useful adjustments to try. Generative output varies, so check the image or video itself before publishing.
The face or label changed
Go back to the original source and remove unrelated changes from the prompt. If exact identity or lettering is essential, retain the original subject pixels on a separate layer instead of asking a generative model to redraw the whole scene.
The subject looks pasted in
Match the new background's light direction, softness and viewpoint to the source. Inspect the contact shadow under objects and hair edges against both light and dark parts of the background.
You need a transparent PNG
A generated scene is a replacement background. It does not establish transparency. Use a background-removal workflow for a cutout, then inspect fine edges before placing it over a new color or image.
Before you generate
Can I try the example's exact source and prompt?
Yes. Open this setup below the flower-shop prompt to load the synthetic source portrait and the displayed instructions into Yiluna's editor. Select a model and review the credit quote. The shown editorial result was created with OpenAI's image-generation tool; your selected model can produce a different result.
Can I change a background without changing the face?
A reference image and precise instructions help direct the edit, but generative editing can alter facial features or clothing. Compare the result with the original. When exact subject pixels are required, isolate the original subject with a mask and composite a new background behind it.
Is copying the background prompt free?
The displayed prompts and source example can be read and reused without an account. Creating a new edited image in Yiluna requires an account and credits; check the editor's quote before submitting.
Can I replace a product photo background?
Yes. The workflow is useful for clean product scenes, lifestyle settings, seasonal concepts, and ad-style backgrounds.
Will the subject stay exactly the same?
AI edits aim to preserve the subject, but details can shift. Review product shape, logos, text, and important identity details before publishing.
Is this different from background removal?
Yes. Background removal isolates the subject, while background replacement generates or edits a new scene around the subject.
Continue your project
Move from a still to a clip, refine a background, or plan the next shot.